Ningbo Winley Bathroom Products Co., Ltd.
Basic Information
- Model No.: WF7018-AS
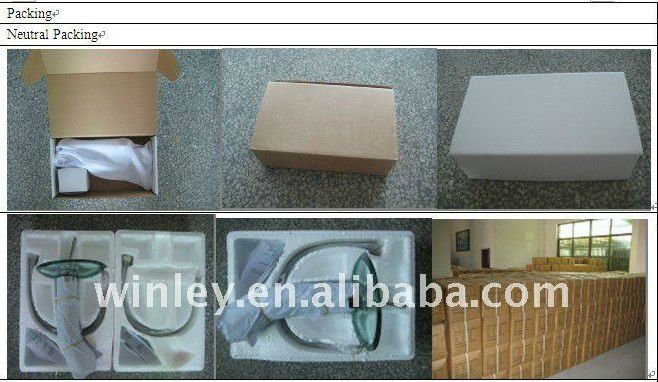
- Packaging: Cotton cloth bag and bubble bag inside, inner packing box (can be designed as your requirement
- Delivery Time: 3 Days
- Place of Origin: Zhejiang, China (Mainland)
- Brand: Winley

Specifications In-Wall Bath Shower Tap
*Brass Bath Shower Faucet with single handle
*Water Saving brass shower tap
*Cu>59%,Pb<1.8%,Fe<0.3%
In-Wall Bath Shower Tap
*Brass Bath Shower Faucet with single handle
*Water Saving brass shower tap
*Cu>59%,Pb<1.8%,Fe<0.3% In-Wall Bath Shower Tap *brass body zine alloy handle shower faucet
*40mm ceramic *Bath faucet with brass body
*sloid brass faucet for bath
*OEM, ODM welcomeBrass
*3 years quality warranty
*CE,ACS,ISO9001.2000 Detailed Product Description ( In-Wall Bath Shower Tap ) 1)ISO9001 and CE certificate 2)Brass faucet body and Zinc alloy handle 3)Ceramic cartridge for smooth and long lasting operation 4)Cold-hot water transformation handle 5)Fashionable show 6) you can use it more than 500000 times,durable 7)Five-story plating,72 hours salt spray test 8)Water saving 9)Easy to Install 10)Corrosion protection 11)Smooth water flowing 12)accessories: two SS knitted hoses. 13)Composition(Cu>59%,Pb<1.8%,Fe<0.3%)Low Pb content is good for your healthy. 14)Brass aerator with 4 layers stainless steel nettings,avoid the splash and makes the stream more softer. Processing of In-Wall Bath Shower Tap Feed →Casting Inspection→ Machinery processing → Inspection →Appearance Polishing → Inspection → Electro-Plating→ Inspection → Assembling→ Inspection → Package →Delivery Advantage of In-Wall Bath Shower Tap: 1. Finish - durable thick layer brass polished finish resist corrosion and tarnishing.
2. Body - made of heavy solid brass for durability & reliability. Heavier the better. Don't choose light weighted faucet.
3. Valve - equipped with drip-free ceramic disc valves for long life and smooth feel. Don't choose faucet with plastic valves.
drawing of In-Wall Bath Shower Tap : 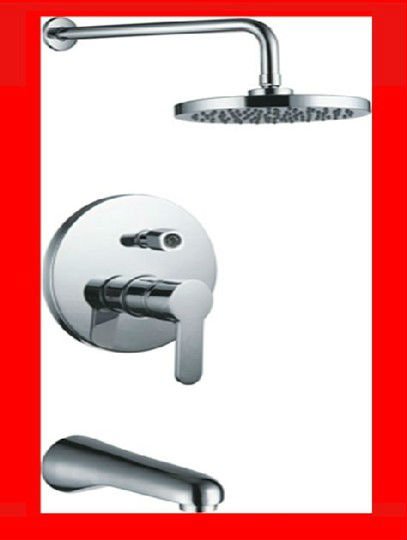 General Faucet Installation Instruction: Please kindly note that this is just a general instruction, each faucet you buy from us has installation instruction with details inside package. Step 1: Position the Faucet
  A: Begin installing your faucet by placing the gasket and faucet in position on the sink. B: From under the sink, thread the plastic mounting nuts onto the faucet shanks. Be sure the large side of each plastic mounting nut is up. C: From the top of the sink, check the faucet and gasket position. D: From under the sink tighten the mounting nuts, making certain not to over-tighten which could damage the nuts and make them difficult to remove in the future. Step 2: Attach the Water Supply Tubes
  A: Wrap the threads of the water-supply valve with Teflon tape. Although most plumbers use only Teflon tape, some plumbing supply manufacturers also recommend using plumber’s putty. B: Thread the water supply nut onto the shut-off valve. Tighten the nut with a wrench. C: Wrap the threads on the faucet shank with Teflon tape, and then thread the water supply nut onto the faucet shank. D: Tighten the nut with a wrench. Step 3: Connect the Faucet Lift Rod
 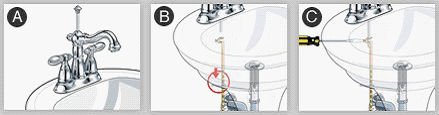 A-1: From the top of the sink, insert the lift-rod into the faucet. A-2: From under the sink, make sure the pivot-rod is in the down position. Insert the lift-rod into the lift-rod strap. Tighten the screw. B-1: From the top of the sink, make sure the lift-rod opens and closes the drain plug as desired. B-2: Make any needed adjustments by loosening the lift-rod strap screw and repositioning the lift-rod. B-3: If you need to connect the lift-rod strap to the pivot rod, slide one end of the spring clip onto the pivot-rod. B-4: Make sure that both the pivot -rod and the lift-rod are in the down position. Insert the pivot-rod in the closest hole in the lift-rod strap. B-5: Slide the other end of the pivot-rod. Make sure the lift-rod opens and closes the drain plug as desired. C-1: Make minor adjustments by loosening the lift-rod strap screw and repositioning the lift-rod. C-2: Make major adjustments by removing the spring clip and moving the pivot-rod to a different hole in the lift-rod strap. Step 4: Flush the Faucet
  A-1: Anytime you work on plumbing, filings, chips, and other debris can fall into the plumbing pipes. A-2: This debris can damage the sealing surfaces inside the faucet and cause leaks. A-3: Remove aerator and black sealing gasket above it. A-4: Before turning on the water supply, make sure the faucet handles are open (on position) in order to remove the debris without causing damage. B: Open both water supply valves under the sink. C-1: Allow the water to run for 15 seconds. C-2: Close the faucet handles (turn off). D: Make sure any debris is cleaned from the aerator screen. E: Replace the aerator. Package of faucet


*Brass Bath Shower Faucet with single handle
*Water Saving brass shower tap
*Cu>59%,Pb<1.8%,Fe<0.3%
In-Wall Bath Shower Tap
*Brass Bath Shower Faucet with single handle
*Water Saving brass shower tap
*Cu>59%,Pb<1.8%,Fe<0.3% In-Wall Bath Shower Tap *brass body zine alloy handle shower faucet
*40mm ceramic *Bath faucet with brass body
*sloid brass faucet for bath
*OEM, ODM welcomeBrass
*3 years quality warranty
*CE,ACS,ISO9001.2000 Detailed Product Description ( In-Wall Bath Shower Tap ) 1)ISO9001 and CE certificate 2)Brass faucet body and Zinc alloy handle 3)Ceramic cartridge for smooth and long lasting operation 4)Cold-hot water transformation handle 5)Fashionable show 6) you can use it more than 500000 times,durable 7)Five-story plating,72 hours salt spray test 8)Water saving 9)Easy to Install 10)Corrosion protection 11)Smooth water flowing 12)accessories: two SS knitted hoses. 13)Composition(Cu>59%,Pb<1.8%,Fe<0.3%)Low Pb content is good for your healthy. 14)Brass aerator with 4 layers stainless steel nettings,avoid the splash and makes the stream more softer. Processing of In-Wall Bath Shower Tap Feed →Casting Inspection→ Machinery processing → Inspection →Appearance Polishing → Inspection → Electro-Plating→ Inspection → Assembling→ Inspection → Package →Delivery Advantage of In-Wall Bath Shower Tap: 1. Finish - durable thick layer brass polished finish resist corrosion and tarnishing.
2. Body - made of heavy solid brass for durability & reliability. Heavier the better. Don't choose light weighted faucet.
3. Valve - equipped with drip-free ceramic disc valves for long life and smooth feel. Don't choose faucet with plastic valves.
| Iems | In-Wall Bath Shower Tap |
| N.W. |
1361g
|
| Delivery ditail
| Trial order in one week ,official order within 20~35days |
|
CTN size
| 51*43*28cm (12pcs)0.061m³5500pcs/20ft container |
|
Payment
| 30% Deposit by T/T +Balance 70% by T/T against B/L Copy |
|
Package | Normally: Each faucet is to be wrapped in a cloth or bubble bag, one faucet is packed in a carton and 12 to a box. A 20ft container include 5500 pcs Special: We can pack the goods on your requriements |
General Faucet Installation Instruction: Please kindly note that this is just a general instruction, each faucet you buy from us has installation instruction with details inside package. Step 1: Position the Faucet A: Begin installing your faucet by placing the gasket and faucet in position on the sink. B: From under the sink, thread the plastic mounting nuts onto the faucet shanks. Be sure the large side of each plastic mounting nut is up. C: From the top of the sink, check the faucet and gasket position. D: From under the sink tighten the mounting nuts, making certain not to over-tighten which could damage the nuts and make them difficult to remove in the future. Step 2: Attach the Water Supply Tubes A: Wrap the threads of the water-supply valve with Teflon tape. Although most plumbers use only Teflon tape, some plumbing supply manufacturers also recommend using plumber’s putty. B: Thread the water supply nut onto the shut-off valve. Tighten the nut with a wrench. C: Wrap the threads on the faucet shank with Teflon tape, and then thread the water supply nut onto the faucet shank. D: Tighten the nut with a wrench. Step 3: Connect the Faucet Lift Rod A-1: From the top of the sink, insert the lift-rod into the faucet. A-2: From under the sink, make sure the pivot-rod is in the down position. Insert the lift-rod into the lift-rod strap. Tighten the screw. B-1: From the top of the sink, make sure the lift-rod opens and closes the drain plug as desired. B-2: Make any needed adjustments by loosening the lift-rod strap screw and repositioning the lift-rod. B-3: If you need to connect the lift-rod strap to the pivot rod, slide one end of the spring clip onto the pivot-rod. B-4: Make sure that both the pivot -rod and the lift-rod are in the down position. Insert the pivot-rod in the closest hole in the lift-rod strap. B-5: Slide the other end of the pivot-rod. Make sure the lift-rod opens and closes the drain plug as desired. C-1: Make minor adjustments by loosening the lift-rod strap screw and repositioning the lift-rod. C-2: Make major adjustments by removing the spring clip and moving the pivot-rod to a different hole in the lift-rod strap. Step 4: Flush the Faucet A-1: Anytime you work on plumbing, filings, chips, and other debris can fall into the plumbing pipes. A-2: This debris can damage the sealing surfaces inside the faucet and cause leaks. A-3: Remove aerator and black sealing gasket above it. A-4: Before turning on the water supply, make sure the faucet handles are open (on position) in order to remove the debris without causing damage. B: Open both water supply valves under the sink. C-1: Allow the water to run for 15 seconds. C-2: Close the faucet handles (turn off). D: Make sure any debris is cleaned from the aerator screen. E: Replace the aerator. Package of faucet Outer Carton Size | Pcs/Ctn | Cbm/Ctn | Qty/20Ft |
| 56.5*32.5*26cm | 4 | 0.048 | 2500 |
Supplier Information
Ningbo Winley Bathroom Products Co., Ltd.
[ Zhejiang China ]
- Business Type : Manufacturer , Trade Company
- Product/Service : Bathroom products , Shower hose , Knitted hose
- Tel : 86-574-62391200
More > Other products from this company